I’m going to walk you through a full mouth dental implants case of an all-on-4 implants (or full arch replacement) that had a couple hiccups along the way. And I’m going to talk about the importance of so many things.
There’s going to be a lot of pearls in this video. As a prospective patient, wherever you’re having this done, I think it’s worth the time to watch this from start to end so that you can understand a little bit about the process and limitations…what to expect.
[Video transcript below (lightly edited for easier readability)]
A little bit about the case
This patient is going to undergo a very standard procedure, but she’s not standard whatsoever. She allows me to show her face, which is just phenomenal because you’re going to learn a lot from it. She has gum disease, periodontal disease, and you can see how red the palate is.
She was wearing one of those embarrassing, removable flippers and the teeth are loose. I believe she used to be a smoker and has stopped at this point, but she’s ready for a new life. She’s got really, really narrow jaws in general, very small arches, especially the upper jaws, very, very narrow. And maybe the lower is a little bit wider. So the two U shape, you have a V and a U on top of each other. You’ll see how that plays out and how I had to modify some things for it to look right.
Analyzing the case and pre-planning
So this is her x-ray. You can see that all of the teeth have severe bone loss and decay and one of them appears to just be kind of hanging there. I’m not sure if you can see this mouse pointer, but it definitely indicates to remove all teeth and there’s quite a bit of space, but she has an overbite — if you notice, an overbite and very narrow jaws.
So when she’s at rest or when she’s smiling, she doesn’t show a lot of teeth. She doesn’t want to show a lot. And when she’s retracted, and some of these are repetitive, but you can see the condition of the teeth. These are very loose teeth.
And this is her face. Very, very nice woman, and very pretty. And I think her smile, once improved, you’re going to see how this change is quite tremendous. So the process is, take all these photographs, assess, diagnose, have a plan, take a face scan of the patient, not just pictures, facial scanning, 3D technologies so that I can do pre-planning.
When we look at the side view, the thing that looks like wax, she was using the wax to kind of hold in some teeth that were falling out; so the wax was like a little Amazon product to just kind of bond something in there. There are cavities and you can see on the other side as well how there’s no real bite. There’s no chewing surface besides that removable partial that she was wearing.
So the plan is going to be under IV sedation in the office. I’m going to start an IV in her arm, give her some meds, give some different medications to make her sleepy and comfortable. And over the course of a few hours, take out all the teeth and put in the dental implants.
And in my office, it’s all done digitally. There’s one appointment before for some scanning and we do digital design. I don’t have time to go into all of that, but I know you’ve seen some other of my blogs on that where we want to simulate the smile, simulate the bite, take a picture of what she used to look like, how I want to look and design that 3D. Save that file, so the day of the surgery, we can convert that new smile design into the new smile.
So this happens in a single surgery (there’s some pictures that may be a little bit bothersome – there’s no surgery photos, but this is what things look like the next day). So these are dissolvable stitches. You can see this. You’ve got very small jaws, not a lot of room for implants. There’s four implants per jaw. You don’t want to have too many. You want to be able to get hygiene access.
Too many implants is not a good thing. Not everybody needs six implants. I’m not opposed. Some of my cases have seven implants. It’s per patient.
Some of these dental implant centers, they just give the same thing to all patients regardless. They have three smiles to choose from and you get small, medium or large unfortunately. I definitely don’t do that at my office.
So this is what things look like the very next day…
Her teeth were made overnight, so we mill them in a computer mill, kind of like little robots that cut the teeth. And this is made that way with my lab designers. This is what the top jaw looks like just 24 hours later. She’s still numb from the day before from a special anesthetic that’s given for numbness. This is not very painful.
And you can see the lab fabricated temporaries or provisionals or prototypes as I call them. These are not the final. This is the underside. Where’s the teeth? This is the underside, which is the most important part that it’s smooth, flat, convex. You call this the “intaglio.” This is what’s going to determine the health of the teeth, longevity of the teeth besides all the surgical planning that went in, implants in the right spot, proper leveling of the bone. I’ve got a lot of information on that, as well.
But these are my prototypes. So they’re designed to look really good. And this is what they look like outside of the mouth. This is the next day. You can still see the sutures there. This is what her teeth look like. This is when she bites down. This took maybe a 30-minute appointment from start to finish.
Took some x-rays and she’s got teeth the very next day that look and feel much better than her original. And this is just a side view of how the bite lines up. And this is her first look at things. You can see, wow, you can see her teeth now. And she smiles. It’s a nice color. I think she wants to go a little bit wider, but she’s still kind of assessing..”is this me? And how do I feel about this?” And it takes some time to get used to, and this patient took a little bit of extra time.
And this is where I’ll talk about not just racing to the finish, making sure that we have prototypes, provisional temporaries, whatever you want to call them that are approved by both patient and doctor. Here’s her profile. She’s looking good, she feels good, and this is what she looks like the next day of the surgery. I mean, that’s literally 24 hours later. It was just amazing to go from where she was to this, but it’s not perfect.
Let’s talk about how it wasn’t perfect. Very nice overall. But she used to have an overbite, so she’s still kind of getting used to what it’s like to not have an overbite. So she wears it for a while. Here’s the x-ray. You can see there’s four standard implants, four standard implants, no zygomatics or pterygoid or some of these special implants that I do for patients that have no bones. Even if you have no bone, you can still have dental implants. That’s a whole other conversation.
So there’s four implants. There’s multi-unit abutments. You can see the outline of the bridges on the x-ray. You can see where they are over here. And that’s just going to sit for about three to five months. Soft diet. This is the process.
So let’s talk about realistic. You’re not going to go chew an apple, so don’t believe those things that you see and bite into something right away. That’s not the truth. That’s just marketing because dental implants are not forever. They can last a long time. There’s a blog, you can look it up. Just type in the word “permanent” to the search bar on my website and you’ll get a lot of information on whether implants are permanent or not.
After 4 months of healing during this full mouth dental implants case
So a few months later, and again, sorry, this is graphic, but this is what the bridges look like after four months of healing, the bridges are taken off. You can see the gums are healthy. It’s supposed to be a little bit red in some spots, so it means we’re putting adequate pressure. And the top jaw looks like that. The bottom jaw looks like that.
But what I wanted to change on her was, she needed a little more upper teeth to show she needed her smile to be wider, even though her jaws are really narrow. Her face really kind of had these dark spots they call the buckle corridor. So I wanted to fill that out. So what I did is took a bunch of pictures with her with the original. So even though you may think this is very nice, maybe don’t, but I’m going to make her a second set of prototypes because I want it to be better. And she would like some changes, as well.
So these are the prototypes. The second set is not the final. They are made of high density plastic. I used an expert laboratory. These are all designed by my lab partner and for really custom results, not just a one size fits all, a small, medium or large, and male or female. So there’s a lot that goes into smile design. So these are the new prototypes. The blue spots are checking the bite, how does it come together, and wow, look at that. So now we’ve got a provisional, a prototype that looks awesome and I’m proud of it.
So at this point, this is many months have gone by. Now I’m ready to go to the final.
She might want to go a little bit brighter, she said. I like this color as is, and she’s ready to move forward.
So we take a few more pictures, make sure our midlines are on, the slant is on. Everything just looks spectacular and the bite is good. And she shows more upper teeth than she used to.
Now I’m going to go to the final. I’ll transition, make another scan and go to the final. These are final zirconia bridges. All the rest before were plastic. You don’t want plastic as a final. You don’t want plastic fused to metal. Those just break.
So you can see the beautiful aesthetics, the pink, the surface underneath where you’re going to water pick and where you’re going to floss. It is smooth, highly polished and easy to clean. It’s important that you have maintenance. You’re going to come in every six months to the office. We’re going to use an airflow to clean, not just scrapers.
And here you can see we call this the intaglio surface, how this fits so perfectly. And here’s what she looks like at the end of the full mouth dental implants case. I think she looks amazing. And these are really close up pictures. These are not far away. They’re right up close. Everything fits the gum line. There’s no gap. If you have a gap, there’s an article on the gap space, you can read about it, as well. And teach her how to clean it and then maintain it.
And here’s her bite, a little bit of an overbite like she had before, which we need to sometimes reproduce. Here’s the arch form, nice and smooth and white. And she’s got 12 teeth on the top and 12 teeth on the bottom. The screw holes are closing, they are all held by screws and multiunit abutments. And I’m very proud of it. It’s just a beautiful case, and I’m so glad that she’s allowed me to share this with you.
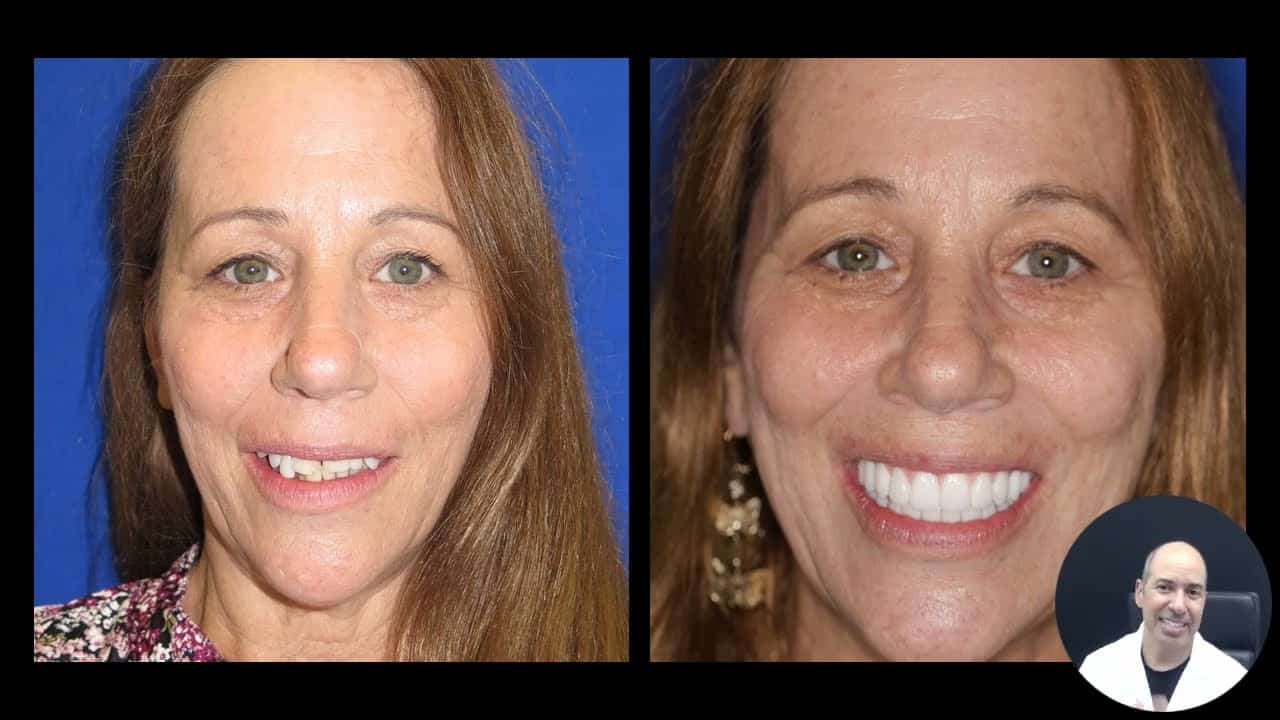
And you can see the final full mouth dental implants case result
Zirconia is always going to look like this. If your bridge does not look all white like that, you don’t have all zirconia, you have some modification of plastic or overlay or something over this. I like just straight zirconia. It’s very strong and it doesn’t break easily at all.
So right into the eyes, very, very nice aesthetics. Very nice aesthetics from the side views and coming up is probably one of my favorite photos of all, the before and after. Sometimes we forget where we started. There’s a lot of little things that I did. Something called open up her vertical dimension and looking at the width of the arches and the bite and what it’s supposed to show.
So the point of all of this is, not to talk about the surgery and all, but making the teeth, I ended up making her two sets of provisionals during this full mouth dental implants case. I call them prototypes in my office so that I knew for sure that what I was going to deliver on the final day wasn’t going to be a surprise.
A lot of the comments that I get in the blog are, “I had this done, I had the teeth and I got the finals and I didn’t like them.” They didn’t fit this and that.
There usually is no difference between how the prototype goes to the finals. Actually, it’s kind of anti-climactic, meaning that you had the prototype, by the time you get to the final, it should kind of look and feel the same because that’s what you like. You’d like to duplicate that. So it’s a matter of drafting everything just right so that you can get a great result and be happy with it.
And my favorite photo of all is with the patient and myself here in my office. And I wish my teeth were as nice as hers.
So I hope this benefits you and you’ve learned some pearls about the process. It’s not a one size fits all. It’s a very personalized approach, at least in my office it is. I enjoy this. I’m passionate about it, and I believe it’s a privilege to do this. So until then, we’ll talk soon.
Comments are always appreciated!
I appreciate this case presentation. It’s very insightful to see how aesthetics, bite, and function are all adjusted before moving to the final restoration.
I went to my dentist yesterday for a broken tooth in my 4 in one dental implants. I had this done three years ago. I was told yesterday that these are still my temporary and not permanent teeth. What can I do
What!! Why?? Please explain. Did you pay for the finals in zirconia?
Hello Dr Amin
I wrote you a couple years ago. My all on 4 procedure didn’t work out. The upper bridge could never be made to fit. If a person had a canted jaw with a 1.5mm offset. Would a bridge have to be specially designed. The left posterior implant was always painful it felt like when I bit down it was being shoved up in the bone and my tuberosity had a constant ache. The doctor buried the upper 2 posterior implants and replaced the 2 anterior implants with snap on abutments. Those are not working either. He increased the VDO 3mm on the new overdenture . After a few weeks my palate ached on the left back corner of the denture. My left nostril was totally blocked and because I had no back implants for support, the denture would drop about 3 or 4mm at the palatal seal and tuberosities. The constant movement made my tissue very sore. After 9 weeks wearing the overdenture I removed it and returned to the temporary denture with no snaps and I lined it with a sea bond adhesive pad temporarily to test the denture. Within 48 hours my sinuses started draining and the bruised palate stopped throbbing. My left jaw overcloses without the upper denture in at night. The lower fixed bridge teeth bite into my upper arch and by morning my tuberosity is aching and throbbing. My dentist made a guard for the lower teeth but it isn’t tall enough on the right side to keep the left from bottoming out. The right side of my mouth would have been okay with the 3mm increased VDO but the left side should not have been more than 1.5 mm increase. I believe because of a accident when I was young my jaw is canted and the reason for the pain in that left posterior implant was from how my teeth fit together and the angle of the teeth under pressure. When the implant was buried that deep bone pain went away. Could it be possible that my jaw is canted and that has been the difficulty in fabricating a upper screw retained bridge that fit properly? When I close my jaws without the upper denture my bones in the left arch behind the tuberosity at the raphe where my arches meet the bones collide but not on the right side there is about 1/8 to 1/4 inch space between the bones. After a night of the constant pounding on the tissue from overclosing my left tuberosity and the canine premolar area hurt unbelievably. What is your opinion on this scenario? I am so confused that 2 oral surgeon and several dentists had no idea how to salvage the all on 4,s implants. They tend to use nerve damage as a possibility, but nerves don’t cause bruises and block sinuses, and quit hurting when the denture is removed or the implant is buried. There has to be a logical reason for dentures not fitting correctly. I realize with the snap overdenture with just 2 anterior implants there will be a little tipping when I bite with the front teeth but it shouldn’t require a lot of adhesive to keep it seated. Any suggestions you have would be greatly appreciated!
Wow. So sorry Jan. Have you considered being seen in a graduate program at a local dental school? This might be your best bet to get some relief. There is no way for me to tell you what to do since I have never seen you. It just sounds like things all went in the wrong direction.
Wow! I’m very impressed with your work. You care about not only your work ethic, but your patients.
Awesome!
Gale, Raleigh, NC
😊👍🏻
Dr. Amin,
You performed wonders on this patient and I know she must be so happy. I wished I knew about you before I had my full mouth restoration completed in 8/2023. I am disappointed that I now have mouth wrinkles and look as though my mouth/lips have shrinked. I have “aged” in the matter of a few months. A face scan was not done. I am very unhappy with the final results. Difficult with eating due to problems with biting and chewing, prostheses are uncomfortable & hurt. If there is something that can be done to correct these issues, please, please let me know. I am so dissatisfied and embarrased by how I look.
Are you local enough to come in Joyce? I will probably have to redo your case. Sorry
My case is similar to Joyce’s. I, too, had a full mouth restoration in September of 2023. Since then, my TMJ has come back worse, my ears ring more and are more full, my teeth are sore and pressed in, and my lower face feels sunken in and swollen. My teeth have never felt like they hit properly, and I have no space for my tongue. I have suffered with this for 2 1/2 years, and I’ve seen many professionals. I’m currently working with a doctor who has given me bite guards, but he doesn’t have a clear answer on how to fix this problem. He has thought about Invisalign, re-doing the caps, and 6 on 1 implants. I have bone loss and perio disease, so he has sent me to other professionals for opinions. I’ve been struggling so long, I need answers and relief soon. What is your take on this?
Hi Betty –I would need to see you to answer all. This is too complex to solve over the web. Sorry
Hi Joyce-
I had the same thing done in September, 2023, and I’ve had complications ever since. My TMJ came back fully, I have more ear ringing and fullness, and my teeth feel pressed in and sore. My lower face seems to have “collapsed”. It’s difficult for me to speak and eating is more difficult. It’s been two and a half years, and I still haven’t found an answer… or relief. What did you wind up doing? -Betty
Dr Amin
Very nice, beautiful smile, what a perfect example of what can be accomplished with this procedure. I can only imagine how thrilled your patient was when she saw her new smile! I will be very happy if my final fixed dentures are even close to being this nice. Thank you for all the information and answers you provide for everyone who asks. Wish I had know about your practice before I started my all on 4 journey 7 months ago, definitely would have taken the 2 hr. drive to see you. Prayers and best wishes